Codex CLI's sandbox and approval policy are two independent axes — understanding their structure lets you delegate large-scale refactoring step by step.
When I first introduced Codex CLI into our team workflow, I made the same mistake. I ran the task of converting the entire auth module from session-based to JWT in full-auto mode and stepped away briefly — when I came back, some uncommitted changes had disappeared and a few test files had been deleted and overwritten with new files. I recovered with git reset --hard, but that morning's work was gone.
At the time, I understood full-auto as "a switch that fully unleashes the agent." The reality was different. full-auto is a shortcut flag that bundles two independent security axes in a specific way, and how you configure each of those axes determines the agent's actual behavior. Only after understanding this structure was I able to delegate refactoring work spanning hundreds of files, broken into stages.
This post is aimed at senior backend and full-stack developers looking to introduce AI coding agents into team workflows. It covers how sandboxes and approval policies operate independently, the criteria for choosing among the three modes — suggest, auto-edit, and full-auto, and how to automatically inject team conventions into the agent with AGENTS.md, with real-world scenarios.
What Is Codex CLI
Codex CLI is an open-source lightweight coding agent released by OpenAI. You can call the latest models like o3 and o4-mini directly from the terminal to build a loop that reads, writes, and executes code. It's appealing to backend developers because it works entirely from the terminal without an IDE, and it can also be embedded directly into CI pipelines or exposed as an MCP server to build multi-agent pipelines.
It has attracted tens of thousands of stars on GitHub and is under active development, and the user base has grown rapidly since the addition of the web-based Codex app.
The Two Security Axes: Sandbox and Approval Policy
The security architecture of Codex CLI is not a single lever — it consists of two independent axes.
The sandbox enforces at the OS level what the agent can technically do. macOS uses Apple Seatbelt; Linux and WSL2 use bubblewrap (bwrap). The default setting is a "workspace-write" mode that blocks network access and allows writes only to the current workspace. Even if the agent makes a request, the OS kernel blocks it outright.
The approval policy determines whether the agent is required to get user confirmation before executing a specific action. If the sandbox defines the "technical scope of what's possible," the approval policy controls "when, within that scope, to ask a human."
The practical meaning of saying the two axes are independent is this: with a strict sandbox, even a loose approval policy reduces the risk of credential leaks or access beyond the workspace. Conversely, even a strict approval policy leaves room for the agent to accidentally touch unintended areas if there's no sandbox.
An agent's action passes through the two layers in sequence. If it doesn't pass the sandbox layer, it never reaches the approval policy.

This sequence is also why the two layers are configured separately. The sandbox defines "what's possible," and the approval policy determines "whether it's permitted" within that scope.
The Three Modes Are Presets of the Two Axes
suggest, auto-edit, and full-auto are presets that bundle the approval policy and sandbox in specific combinations. The impression the mode names give — "a single scale of increasing autonomy" — differs from the actual structure.
| Mode | Approval Policy | Sandbox | Suitable For |
|---|---|---|---|
suggest |
Approval required for all actions | Applied by default | Task exploration, first production deployment |
auto-edit |
File edits automatic / Shell commands require approval | Applied by default | Trust file changes but control shell |
full-auto |
All actions automatic | Workspace-write | Isolated containers, CI automation loops |
This is why the --full-auto flag differs from "simply disabling the approval policy." The flag sets the approval policy to "auto-execute" while simultaneously configuring the sandbox to "workspace-write" explicitly. It's a shortcut that sets both axes with a single flag.
Cases where you need to configure the two axes independently — such as blocking reads on specific paths only, or allowing network access while always requiring approval for shell commands — can be configured separately in ~/.codex/config.toml.
Prompts passed to Codex CLI produce more consistent results when written in English. The code examples below are also written with English prompts.
# Usage examples by mode
codex --approval-mode suggest "Review the auth module refactoring plan and list affected files"
codex --approval-mode auto-edit "Add error handling to all service layer functions"

# Must be run in an isolated container or throw-away branch
codex --full-auto "Run tests and fix any failures, then verify with another test run"
AGENTS.md: Injecting Team Standards into the Agent
Codex reads the AGENTS.md file before starting a task. It is loaded hierarchically from global (~/.codex/AGENTS.md) and project root levels, and the contents of both files are merged and passed to the agent.
By defining coding guidelines that were previously communicated verbally in AGENTS.md, the agent will automatically follow team conventions on every task. It's also effective to register patterns that repeatedly come up in code reviews as forbidden rules.
# AGENTS.md Example (project root)

## Coding Standards
- Maintain TypeScript strict mode
- Include try-catch in all async functions
- Test files go in __tests__/ directory

## Forbidden Patterns
- No direct console.log usage (use logger)
- No any type usage

## Workflow
- Always check current test coverage before changes
- Running npm test after changes is mandatory
You can use the --print-instructions flag to see the actual merged AGENTS.md content that was loaded. This is useful for verifying that the configuration is being injected properly.
Filesystem Security: deny-read Policy
The deny_read setting in ~/.codex/config.toml blocks reads to specific paths entirely. If the sandbox layer's default setting limits the write scope, deny-read is an additional setting that explicitly narrows the read scope.
# ~/.codex/config.toml
[sandbox]
deny_read = [
  ".env",
  ".env.*",
  "**/*.pem",
  "**/credentials.json",
  "~/.ssh/**"
]
This proactively prevents scenarios where credential files are exposed due to prompt injection attacks or agent mistakes. Setting it once in the global config applies it to all projects.
Practical Application
Scenario 1: Auth Middleware Refactoring — 3-Stage Progressive Delegation
The most commonly used pattern in practice is progressing through the stages in order: suggest → auto-edit → full-auto. At each stage, you verify the results and build confidence.

# Step 1: First check refactoring scope with suggest mode
codex --approval-mode suggest \
  "Refactor the auth middleware from session-based to JWT. \
   Show the list of affected files and the planned changes before making any edits."

# Step 2: After confirming scope, make actual changes with auto-edit on a feature branch
git checkout -b feature/auth-jwt-refactor
codex --approval-mode auto-edit \
  "Convert the auth middleware to JWT. \
   Follow error handling rules in AGENTS.md. Do not modify existing test files."

# Step 3: Auto-fix tests after reviewing the diff
# Must be run in an isolated container or throw-away branch
codex --full-auto \
  "Run npm test, fix failing test cases, and verify with another npm test run."
The key to Step 1 is structuring the prompt so the agent presents its change plan first. It's good for the team to agree in advance on the criterion of not proceeding to Step 2 if the change scope is larger or different than expected.
Scenario 2: Large-Scale Monorepo Migration
For migrations spanning hundreds of files, the key is breaking the scope into small logical units. Instead of broad instructions like "modernize the codebase," splitting tasks by service unit makes results far more predictable.
# Full analysis first
codex --approval-mode suggest \
  "Identify candidates for microservice extraction from the legacy Express router. \
   Suggest a dependency graph and recommended extraction order."

# Run sequentially on separate branches per service
git checkout -b migrate/user-service
codex --approval-mode auto-edit \
  "Extract user-related routes and business logic into a UserService class. \
   Modify the existing router to call UserService. Do not change other services."

# Verify in an isolated environment
# Must be run in an isolated container or throw-away branch
codex --full-auto \
  "Write unit tests for UserService and verify they pass with npm test."
Scenario 3: Embedding an Automated Test-Fix Loop in the CI/CD Pipeline
full-auto is most effective inside an isolated container. Embedding a run tests → analyze failures → auto-fix → re-run loop into a CI stage can significantly reduce the cost of maintaining tests on refactoring branches.
# .github/workflows/codex-test-fix.yml example
jobs:
  auto-fix-tests:
    runs-on: ubuntu-latest
    container:
      image: node:20-slim
    steps:
      - uses: actions/checkout@v4
      - name: Install Codex CLI
        run: npm install -g @openai/codex
      - name: Run tests and auto-fix failures
        env:
          OPENAI_API_KEY: ${{ secrets.OPENAI_API_KEY }}
        run: |
          codex --full-auto \
            "Run npm test, analyze failures, and fix them. \
             Run npm test again to verify. \
             If tests still fail after 3 attempts, stop and summarize the root causes."
In a container environment, isolation is guaranteed without a separate network-blocking sandbox. The --dangerously-bypass-approvals-and-sandbox flag is exclusively for environments like this where the container already guarantees isolation, and it is not recommended for use in a local workspace.
Expanding to a Multi-Agent Pipeline
To go beyond a single Codex CLI instance, you can expose Codex CLI as an MCP server and orchestrate it with the Agents SDK. This is a pipeline where a refactoring agent completes its changes, then a separate validation agent reviews the results and decides whether to merge.
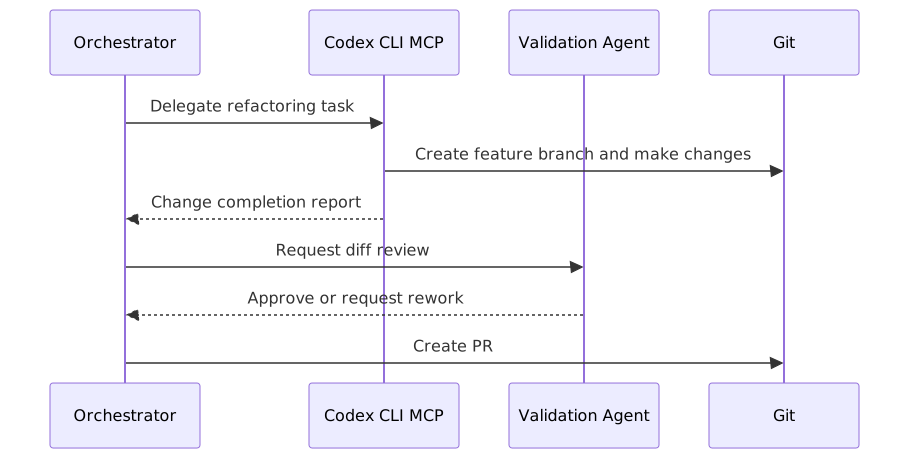
The practical value of this pattern lies in automated risk classification. You can configure the validation agent to determine one of "auto-merge eligible," "human review required," or "rework requested" based on the size of the change, the types of modified files, and the change in test coverage. There's an upfront cost to building the pipeline, but for teams with a high volume of repetitive refactoring work, the return on investment is worthwhile.
Pros and Cons
Pros
| Item | Details |
|---|---|
| Gradual autonomy control | Three stages — suggest → auto-edit → full-auto — allow adjusting the delegation scope to match the team's trust level |
| OS-level isolation | Powerful isolation with Seatbelt / bubblewrap without additional infrastructure |
| AGENTS.md standardization | Agent automatically follows team conventions on every task |
| MCP extensibility | Enables multi-agent orchestration and integration into existing CI toolchains |
| Open source | Can be customized to meet enterprise security requirements |
Cons
| Item | Details |
|---|---|
| Destructive potential of full-auto | Risk of overwriting uncommitted work or executing unintended shell commands |
| Prompt injection risk | Malicious external data can manipulate agent behavior |
| Large diff review burden | Difficult for humans to review all changes when thousands of lines are modified |
| API costs | Long-running tasks consume significant tokens |
Common Mistakes in Practice
Using full-auto locally
Using --full-auto in a local workspace without an isolated container can overwrite uncommitted changes. The rule is to use full-auto only in a throw-away container or an isolated feature branch.
Defining the task scope too broadly
Instructions like "modernize the entire codebase" produce unpredictable results. The narrower the scope — such as "convert the auth middleware to JWT" — the safer and more reviewable the agent's output.
Missing deny-read configuration
Running the agent without blocking reads on .env and credential files leaves it vulnerable to prompt injection attacks. The deny_read setting in config.toml is not optional.
Starting without AGENTS.md
If team conventions are not defined in AGENTS.md, code generated by the agent may repeatedly come back in code review. It's best to draft AGENTS.md first when initially introducing the agent.
Getting Started
Step 1: Set up deny-read and AGENTS.md first
Add .env and credential file paths to deny-read in ~/.codex/config.toml, and create an AGENTS.md at the project root to define team coding standards. These two are your basic safety net.
Step 2: First run a small task in suggest mode
Running a small, clearly scoped refactoring in suggest mode lets you understand what kind of change plan the agent formulates. It's good to agree with the team in advance on the criterion for proceeding to the next step when the plan matches expectations.
Step 3: Switch to auto-edit → full-auto on an isolated branch
For trusted tasks only, create a feature branch, move up to auto-edit, and then run only the test-fixing stage with full-auto in an isolated container. As the team becomes comfortable with this pattern, you can progressively expand the scope of delegation.
References
- Codex CLI Official Docs — OpenAI Developers
- Agent Approvals & Security — OpenAI Developers
- Sandbox Concepts Official Docs — OpenAI Developers
- Custom instructions with AGENTS.md — OpenAI Developers
- Configuration Reference — OpenAI Developers
- Building Consistent Workflows with Codex CLI & Agents SDK — OpenAI Cookbook
- Refactor your codebase — OpenAI
- Run code migrations — OpenAI
- Modernizing your Codebase with Codex — OpenAI Cookbook
- How OpenAI uses Codex (PDF)
- Introducing upgrades to Codex — OpenAI Official Blog
- Codex CLI Guide 2026: Setup, Sandbox, AGENTS.md & MCP
- Codex CLI Filesystem Security: Deny-Read Policies
- Codex CLI Split Permissions — Fine-Grained Filesystem & Network Policies
- Using Codex CLI YOLO Mode Safely
- OpenAI Codex Security: Risks, Controls, and Best Practices — CybeDefend
- openai/codex GitHub Repository